How Do We Test For Continuity Using Digital Multimeters?

As far as testing is concerned, testing for continuity also holds a big deal to know if something is wrong with your electrical circuit. It takes a significant stand in testing since it will allow you to know if there’s something wrong with the current flow. Technically, it checks if the current in the circuit is still continuous.

Think of it this way, if a straw is bent, little liquid can pass through it and if in such circumstances that it is punctured, then all liquids will likely seep through that hole. It is the same thing with electrical circuits. Devices will not function properly if the current can’t flow freely.

Watch out for these two things…

There are two things that you need to watch out for when you test for continuity. Mainly, these are the resistance between the two points measured. Ideally, low resistance means that there is electrical continuity. Meanwhile, high resistance means that the circuit is open and therefore, the continuity is lacking.

The best device to measure is a digital multimeter.

Fluke Digital Multimeters are one of the most versatile tools that a maintenance person can have. Not only does it boast advanced functions, but its efficiency is well-spoken. This infamous tool has all the qualities that Fluke tools possess, but the most notable one will truly be keeping workers safe from possible electrical hazards that are inevitable to happen.

These are the most preferred tools for testing continuity since digital multimeters can be used to test switches, fuses, electrical connections, conductors, and other components. Its flexibility to test multiple assets in one makes them the most suitable tool for the job.

Benefits of Continuity Testing

According to Power Assembles, in order for electricity to flow, things need to stay connected. Ideally, there can’t be any breaks in the pathway or there won’t be a continuous flow of electricity. And this is where the need for continuity testing comes in. One of the huge benefits that continuity testing holds is its ability to determine faults within electrical circuits that can be harmful to man in the long run. But that’s not all, take a look at the other benefits that they hold…

Other benefits of continuity testing:

  • Continuity testing can let you determine if a circuit is open, closed, or shorted.
  • It lets you know if a fuse is good or blown.
  • Makes sure a switch is operating properly.
  • Verifies wires operating on the same circuit.
  • Validates whether wire and cable assemblies are functional.
  • Helps test the resistance of conductors.

Here’s a quick guide on how you can do continuity testing using digital multimeters.

Let’s go into detail on how you can safely perform a continuity test using your digital multimeter. And no, it’s not as complicated as you may think. It’s actually fairly easy to understand, it only takes a couple of steps for you to give this a shot. According to an official Fluke source, here’s how you can do it…

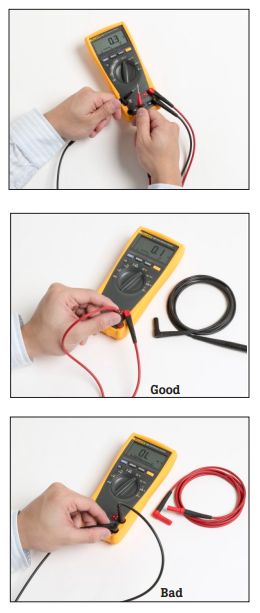
  1. First, insert the black test lead into the COM jack.
  1. Then insert the red lead into the VΩ jack. When finished, remove the leads in reverse order: red first, then black.
  1. With the circuit de-energized, connect the test leads across the component being tested. The position of the test leads is arbitrary. Note that the component may need to be isolated from other components in the circuit.
  1. The digital multimeter (DMM) beeps if a complete path (continuity) is detected. If the circuit is open (the switch is in the OFF position), the DMM will not beep.
  1. When finished, turn the multimeter OFF to preserve battery life.

Get your digital multimeters through an authentic source!

Hey, you made it to the bottom! Are you currently looking for the best-performing test tools in the market to run daily maintenance checks on your machines? You’re in luck cause Presidium PH is an authorized distributor of Fluke test tools in the Philippines. Prevent these faults from penetrating your machine by using the best test tools there are!

If you want to know more about Fluke tools and their functions, visit our website for more info! This is a one-stop shop for the best test tools within Metro Manila.

Shop Now: https://presidium.ph/?s=clamp+meter+

Read more

Electrical Measurement Safety: How to Test Your Test Leads?

Test leads are a common sight to maintenance and women who are constantly working in electrical testing. It is also a known tool for electrical measurement safety that is often seen connected to digital multimeters. What most users do not know is that it is a Fluke accessory that is ideal to use in every operation especially if you’re using a digital multimeter (or a Fluke device that can be connected to test leads).

Importance of test leads.

Some people might think that it’s okay to measure without leads. But having to do so is very unwise. Never take your leads for granted. Even with the use of the infamous Fluke tools, you will still not be completely bulletproof when a hazardous occurrence takes place.

Test Leads will act as the first line of defense when you encounter high currents. Given the electrical measurement safety that it provides users, it makes it an essential part of test tools, especially for digital multimeters.

Make sure that your test leads are safe to use.

It is partly common knowledge that test leads are a vital part of every digital multimeter. With this said, you need to make sure that they are always in good working condition. Keep in mind that Fluke test tools are always going to be something more when they are paired with Fluke accessories like test leads. But beware, test leads may seem like a durable accessory but they are also prone to over usage and wear, making them decrease in performance.

Therefore, it is particularly important for you to inspect them before and after usage. A malfunctioning test lead can make matters worse for you than you think. In the maintenance department where accurate reading is necessary, a worn test lead may just get you into trouble. You see, test leads are prone to giving inaccurate readings when they are (1) under-rated, (2) worn, and (3) poorly manufactured.

Prevent the possible hazards.

Although test leads are naturally safe to use, there is an excessively significant difference once it starts to get old. Ideally, all test tools and accessories need a keen eye as well as all sorts of maintenance checks to keep them in good working condition. And this does not leave out test leads. If there are no maintenance checks for these test tools, daily maintenance operations might take a turn for the worst.

Remember that test leads are our first line of defense when working with high currents? Well, at worst and your test leads are in real bad shape to perform any extremely sensitive maintenance checks, then your test leads may provoke electrocution and shock hazards for the user. Therefore, it is very much preferred to also check your test leads to prevent the possible hazards that they may pose.

Do not forget to evaluate the test leads!

You read it right, your test leads also need to evaluate to ensure that they are still fit to do readings accurately and safely. It is simple to apply these in your day-to-day tool maintenance check. Trust that caring for your test leads early on can reap rewards in terms of future use. This will ensure accurate readings in every electrical measurement operation. Here’s how you’ll do it according to an official Fluke source!

Assessing the test leads:

  • Make sure to evaluate the leads while it is plugged into your DMM (digital multimeter).
  • Assess your leads using a simple OHMs measurement to ensure reliability.
  • You may isolate a problem to one lead or the other by assessing them separately.
  • If you are doing separate testing, simply connect one lead at a time between the ohms and common input.
Photo Source: Newark

Additional Tips: Conduct an inspection for your test leads.

Some of the underlying issues of test leads can be seen in plain sight. A visual inspection might just do it. It is simple, doable, and will not require much of your time. That is if you know what you are looking for and where to look for faults.

When you are conducting a visual inspection, you should (1) check the insulation. Make sure that it is not cracked or nicked. This is because with age the insulation material—whether PVC or

silicone—can become dried out, brittle, and susceptible to cracking. (2) Be sure that there are no gaps or cracks located at the junction between the insulated wire and the banana-like plugs at each end.

Resolve these failures using Fluke Tools!

Hey, you made it to the bottom! Are you currently looking for the best-performing test tools in the market to run daily maintenance checks on your machines? You are in luck cause Presidium PH is an authorized distributor of Fluke test tools in the Philippines. Prevent these faults from penetrating your machine by using the best test tools there are!

If you want to know more about Fluke tools and their functions, visit our website for more info! This is a one-stop shop for the best test tools within Metro Manila.

Shop now: https://presidium.ph/?s=test+leads+

Read more

How Often Should You Calibrate?

Calibrate your Fluke tools to keep them in pristine shape. For test tools, calibration is one of the utmost crucial steps for you to maintain their performance level and their accuracy in reading and testing. Many may think that calibration happens only once, but you need to do it based on the exposure to stress that your Fluke tool experiences. But the question remains, how often should we calibrate fluke tools?

There is additional to it than simply ensuring that the tools are dependable and safe. Take note that there are multiple calibration tools and not just one to ensure that all products and Fluke equipment are accounted for. There is also a thing called calibration intervals which also stands on important grounds when you are planning to do this on a regular basis, but we’ll get to that in a bit.

Importance of calibration

Fluke builds to last. The durability of products is one aspect that Fluke considers when building test tools. Therefore, Fluke is known for its rugged features and its ability to withstand harsh elements. Moreover, it can tolerate strenuous activities and pressure since these test tools are built to keep workers safe and confident working in risky environments. And that is what makes them so sought-after. Initially, when Fluke builds a product, one of the most important things we think about is how our instruments perform over time. And this is where calibration comes in.

Calibration ensures that the device is still well-equipped to manage activities that are in a high-pressure environment.  Moreover, performing calibration can reap rewards overall since you will be able to determine errors, faults, and the limits of your test tool.

What are Calibration Intervals?

Be aware of calibration intervals. As the name itself suggests, calibration intervals are the time in between calibration tests. It is the period that the test tools need before going back for a recalibration session. There is no hard rule for calibration but there is a couple of things you need to remember to determine whether your Fluke tools need one.

How often do you need to calibrate?

The utmost accurate calibration is twenty minutes intervals! We know that is a close call but don’t worry, this doesn’t mean that you need to calibrate every twenty minutes. A one-year calibration is preferred. But that is not only the one specific timeline that you must keep track of. If your Fluke tool is frequently in use and is mostly exposed to harsh environments, you might need to calibrate more often. Here is a quick guide to it!

Calibrate through manufacturer recommendation.

These are calibration instructions based on the manual itself. You can find your manuals tucked in the box of your Fluke tool. Every box has a warranty inside, if it doesn’t have one, then you better have a chat with your supplier. Those aren’t official Fluke products.

Also, keep in mind that the calibration interval may be different for each tool depending on the gravity of its usage.

Calibrate before undergoing a major critical measuring project.

It is preferred for you to calibrate your Fluke device accordingly before an extremely sensitive operation. Let us say you are about to do testing that requires accurate results. To achieve this, you need to prep your Fluke tool through calibration. Keep in mind that the older your Fluke tool is, the more it needs calibration to ensure that it is still at the tip of its performance.

Take note that operating on an extremely sensitive project may require you to act based on your finding. This fact makes it even more important for you to calibrate accordingly.

Calibrate after a major critical measuring project.

Calibrating before the project is just as important as calibrating your Fluke device after. In some industries that rely on accurate data. It is actually a required process for them to also calibrate after the testing. This is done because it ensures that the reference used can either show an intolerant condition before, during, or after the measurement project.

Calibrate monthly, quarterly, or semi-annually

As we’ve stated before, calibration is truly a recommended step for every Fluke test tool. The shorter the time span of your calibration, the better. This will ensure that your tools are in good reading condition. Plus, this will prevent you from receiving questionable readings during your operations.

So really, calibrate your Fluke tool whenever you can. Make it monthly, quarterly, annually, semi-annually, etc. Just always remember to calibrate your tool to keep them at their peak performance during every operation. But of course, the decision still stands with the user. You can either opt for shorter cycles or longer cycles depending on the results.

Calibrate through an authentic source!

Presidium PH is an authorized distributor of Fluke test tools in the Philippines. Rest assured that all tools have gone through calibration and proper tests. Prevent faults from penetrating your projects that might cause bad downtimes by using the best test tools there are!

If you want to know more about Fluke tools and their functions, visit our website for more info! This is a one-stop shop for the best test tools within Metro Manila.

Email us at calservices@presidium.ph / info@presidium.ph

Read more

Pressure Calibrating Transmitters in Potentially Explosive Atmospheres

It is always a challenging feat to perform operations in a potentially dangerous environment. And even with the greatest test tools that adhere to its user’s safety, you cannot be completely complacent. Pressure calibrating can pose a challenging task when done in a potentially explosive atmosphere. Therefore, when faced with such an assignment, make sure that you have undergone proper training and are equipped with the right equipment.

A deeper understanding of “intrinsically safe”

Primarily, to conduct pressure calibration in a high-risk atmosphere, you need a tool that is deemed “intrinsically safe”. To give a simple explanation, if your tool is intrinsically safe, it means that it is designed to prevent the release of sufficient energy by either thermal or electrical means. Doing so will cause the ignition of flammable material such as gas or dust particles.

In general, intrinsically safe standards don’t just apply to one device or a certain operation, but it applies to all tools and devices that are regularly exposed to potential explosive sources. Here are some of them…

  • Electrical sparks
  • Electrical arcs
  • Flames
  • Hot surfaces
  • Static electricity
  • Electromagnetic radiation
  • Chemical reactions
  • Mechanical impact
  • Mechanical friction
  • Compression ignition
  • Acoustic energy
  • Ionizing radiation

If you are a technician or maintenance man working in industries such as mining, petrochemical, pharmaceutical, or something that exposes you to explosive gases then make sure that your devices are deemed intrinsically safe. Remember, that you are the best asset on the field, so do not take any chances of proceeding with your operation without safe tools to use.

How to pressure calibrate a transmitter in a risky environment.

Now you know all about the device’s safety, let us move on to pressure calibrating a transmitter. It is already a given that you’ll probably tread on eggshells the entire time and try not to provoke the explosive substances that are surrounding you. However, that is not all you need to worry about. The most important thing that you need to do is to perform the procedure carefully and with precision.

Here’s how you can do it according to an official Fluke source:

  1. Depressurize and isolate the transmitter. If opening the transmitter exposes voltages beyond the Intrinsic Safe (I.S.) rating use a continuous monitoring gas detector to monitor for explosive gases.
  2. Plumb the transmitter to the 1/8 inch NPT pressure port of the 718Ex. Connect the test leads per the figure above.
  3. Turn the calibrator on. Vent the calibrator and press zero to zero the pressure displayed. Close the vent control.
  4. Press the UNITS key until PSI shows in the display.
  5. With the 718Ex’s bleed valve open to the atmosphere, press the ZERO key. Close the bleed valve. Set the pressure/vacuum valve to +, for positive pressure.
  6. Use the hand pump to apply 3 psi to the transmitter. Partial pump strokes will apply small increments of pressure. Use the fine-adjust knob to get close to 3.00 psi.
  7. Press the HOLD key and record the psi and mA readings. Press the HOLD key to resume reading.
  8. Calculate and record the error, using: Error = ([(i-4)/16] – [(P-3)/12]) * 100 where Error is in % of span, i is your measured current in mA, and P is your measured pressure in psi.
  9. Repeat steps 5 through 7 at mid-range, around 9 psi, to check linearity at mid-span.
  10. Repeat steps 5 through 7, now at 15 psi, for a check at 100 % of span.
Photo Source: https://us.flukecal.com/literature/articles-and-education/pressure-calibration/application-notes/calibrating-pressure-transm

Purchase from an authentic source!

Hey, you made it to the bottom! Are you currently looking for the best-performing test tools in the market to run daily maintenance checks on your machines? You are in luck cause Presidium PH is an authorized distributor of Fluke test tools in the Philippines.

If you want to know more about Fluke tools and their functions, visit our website for more info! This is a one-stop shop for the best test tools within Metro Manila.

Visit our website https://presidium.ph/shop/?wlfilter=1&product_cat=fluke-calibration to know more about our fluke calibration products.

Read more

The Importance Of Electrical Grounding

What is electrical grounding?

Indeed, people have made notable advancements in the electricity department and electrical grounding is one of its big improvements. Technically, electrical grounding is storing electricity on the ground to prevent fatal risks from occurring. It is the process of connecting electrical panels, electrical motors, installations, electrical controls, etc, to the earth. As a result, this will make the environment safer for people since it reduces dangers from civilians and equipment.

What happens if I do not do electrical grounding?

You will be exposed to fatal shocks if your currents are not grounded. So, there are three things about wiring that you need to know about. Ideally, there is an active wire, a neutral wire, and a grounding wire. So, let us look at each one of them closely.

An active wire is the one that supplies power to the wires. Meanwhile, the neutral wire is the one that carries the current back. Lastly, the grounding wire is the one that can be attached to outlets as well as other electrical devices to be connected to the ground at the breaker box.

Originally, the grounding wire is only an additional feature. However, regardless of their “newness” grounding wires holds the most advantageous feature for people since it gives them complete protection from fatal shocks. The grounding wires work for electrical current to safely return to the ground.

As a result, if a short circuit did occur the current would flow through the ground wire causing a blown fuse or tripped circuit breaker. Better a blown fuse or a tripped circuit breaker than a fatal shock, right?

Benefits of proper grounding

Let us face it. Grounding is also one of the most overlooked aspects when it comes to electrical wiring. Nevertheless, according to Platinum Electricians, grounding your wires is an ideal choice to provide protection against possible shocks. They explained. “Grounding your electrical system is a smart and effortless way to make it a whole lot safer, as well as to protect against the very real possibility of having to deal with fluctuations in power supply.”

Just imagine if an electrical error occurs such as lightning strikes or power surges. When you have no electrical grounding, this will cause metal components to function as conductive surfaces. Therefore, these surfaces become electrically energized. And when people touch these surfaces, they will get shocked in the process.

Platinum Electricians further explained by saying, “If you want to safeguard all of your important assets, whether at home or at the office, as well as a lookout for the health and safety of everyone around you, find out if your electrical system is grounded”.”

Advantages of proper grounding according to Conserve Online:

  • Eliminates shock hazard
  • Protects equipment from voltage
  • Prevents electrical fires
  • Reduces equipment repair cost and downtime
  • Lowers levels of electrical noise (fluctuations in an electrical signal)

Why do you need electrical grounding

Not only does it bring notable safety benefits for people and their equipment, but it also brings a lot to the table overall. So, if you do not want your electricity grounded, you might want to think again. Take note of these four significant reasons why you should.

  • Electrical grounding protects against electrical overloads.
  • It stabilizes voltage levels
  • Earth conducts with least resistance
  • It prevents severe damage and death

Resolve these failures using Fluke Tools!

Hey, you made it to the bottom! Are you currently looking for the best-performing test tools in the market to run daily maintenance checks on your machines? You are in luck cause Presidium PH is an authorized distributor of Fluke test tools in the Philippines. Prevent these faults from penetrating your machine by using the best test tools there are!

If you want to know more about Fluke tools and their functions, visit our website for more info! This is a one-stop shop for the best test tools within Metro Manila.

List of Fluke models: https://presidium.ph/earth-ground-testers/

Read more

Quick Run Through of Power Quality Symptoms and What’s Causing Them

Are you experiencing power-related symptoms with your machines, panels, or electrical wiring? Although it is a given fact that Fluke tools can undoubtedly solve these issues with a simple click of buttons, it is also a good practice for electricians and caretakers to know what is causing them. Remember that action prevention is always better than relying on tools alone. Therefore, knowing the causes of power quality symptoms also takes a substantial chunk regarding understanding the process for it to go as smoothly as possible.

Importance of power quality

When we touch upon the topic of power quality, it relates to things that consume power. And for electronics and machines to function properly, they need a good consistent flow of voltage. Power quality is important because, in the modern world that we live in today, electricity and power are widely used and saturated in most businesses and households. Imagine what it would be like when your power is tripping or acting up. This will cause unwanted downtimes for businesses, and it will also cause pricey maintenance assistance.

Remember the famous quote “health is wealth”? It does not just apply to people’s health, but it also applies to electrical aspects as well. Keeping your power lines in their peak condition and maintaining their optimum power quality will be beneficial for your business and households overall.

Causes of poor power quality

If you are experiencing these issues with your lights or electricity in general, then it might be high time for you to contact someone to look at your powerlines. Take note that the causes of poor power quality can happen to any electrically powered thing when it is starting to age. According to ICAR, here are some of the possible causes of poor power quality…

Probable causes:

  • Power failures (Release switches, fuses blowing).
  • Breakdowns or malfunctions of machines.
  • Overheating of machines (transformers, motors, etc.) leads to reduced useful life.
  • Damage to sensitive equipment (computers, production line control systems, etc.).
  • Electronic communication interference.
  • Increased distribution system losses.
  • The need to oversize systems to cope with additional electric stress results in higher installation and operational costs.
  • Luminosity flickering

A quick run-through of power quality symptoms.

Let us not make things complicated. There are a lot of possible causes of why your electric machines or your panels are malfunctioning. Here, we are going to quickly run-down the most common ones that you will experience. We will state the issues, their symptoms, and their possible potential causes.

Dips and Sags

One of the most common occurrences of electrical or power-related issues is “dips and sags”. You will know it when it happens when you start experiencing dimming lights, computer lockups, equipment shutdown, systems shut down, and unexplained shutdowns in general.

One of the main causes of dips and sags are extreme weather conditions that can really shake up electrical lines and cable posts. In line with this, starting large loads, especially large inductive can also be a reason for electrical dips and sags.

Electrical Swells

You might want to watch out for electrical swells. You will know when your power lines are experiencing this when your power supplies are failing. Also, overvoltage shutdowns and alarms on variable frequency drives can be in the works when electrical swells take place. The potential causes for this are capacitor bank switching, sudden load decrease, or faulty single phase of three-phase systems.

Transients

One of the most dangerous causes of power quality symptom transient usually triggers arcing effects and flashovers that are very harmful to maintenance men and women when they are exposed to them. In line with this, it also triggers damaged insulations, computer lockups, and failed electronics.

To prevent this occurrence, try and watch out for these things that are causing them.

  • Lightning strikes
  • Switching of capacitors
  • Reenergizing systems after a power failure
  • Sudden stoppage of large equipment
  • Dirty or worn contactors

Harmonics

Its symptoms consist of overheated electrical functions. To prevent this, watch out for the overheating of your conductors, transformers, and inductive motors. These elements can cause damage to your harmonics. Also, like other causes of poor power quality, you may also experience unexplained shutdowns of your electronic equipment. But let us not forget about its potential causes.

Causes of harmonics:

  • Nonlinear loads such as switching power supplies
  • Converter sections of uninterruptible power supply (UPS), VFDs, and battery chargers
  • Welders
  • Arc furnaces

Power Interruptions

This is one of the most common faults that people experience when heavy rains or storms occur. technically, this entails a total power shutdown of appliances, lights, or anything that is powered by electricity. In simple terms, it is a momentary loss of utility power. Power interruptions may seem like a simple and common thing, but it is also a cause of unwanted downtimes that can affect a business’s productivity. Not to mention, some downtimes can be costly to some industries as well.

Resolve these failures using Fluke Tools!

Hey, you made it to the bottom! Are you currently looking for the best-performing test tools in the market to run daily maintenance checks on your machines? You are in luck cause Presidium PH is an authorized distributor of Fluke test tools in the Philippines. Prevent these faults from penetrating your machine by using the best test tools there are!

If you want to know more about Fluke tools and their functions, visit our website for more info! This is a one-stop-shop for the best test tools within Metro Manila.

Read more

Electric Safety: 5 Preventive Practices to Keep You From Harm During Operations

Method with caution is the rule of thumb of most people who are working with electricity. Live wires or dead wires, one should never be complacent when testing or doing maintenance checks. Nevertheless, there will always be a certain pressure for workers to get the job done no matter what happens. And when certain pressures are breathing down your neck, you might have the tendency to miss a few electric safety steps.

However, missing a few safety steps shouldn’t be something to feel bad about. Actually, even professionals can sometimes make those mistakes. The bigger picture is your safety when you’re around electrical wires. So here are things that you should prevent doing when you’re around them.

Here are preventive practices you should keep in mind when testing electricity…

These are just quick reminders for people who are working closely with live wires (or dead ones) daily. Ignorance of simple things can sometimes be the main cause of a project’s destruction or an immediate trip to the emergency room. Therefore, it’s always a smart move to be very careful and attentive when doing electric testing. Here are some of the common mistakes you should watch out for.

Electric Safety: Working on live circuits

You should limit your exposure to live wires as much as possible. One of Fluke’s best features is its ability to take measurements from afar making its user well protected and away from danger. The best course of action is to de-energize the live wire or switch off the main power source. But then again, why should you vie away from electrical circuits when you have your full protective gear on? It’s because your PPE can only protect you to a certain extent. So, if you’re working with live circuits, better have full insulted tools together with your PPE.

Electric Safety: Refusing to upgrade test tools

You have to upgrade your test tools. We’re not saying you should purchase every time a new one comes out, but if the said tools are going to help you in doing the job better, then, why not right? Good tools are an investment especially if you’re planning on having a career in the electrical department.

Your tool might be working perfectly fine right now but can you still say the same 10 years after? No matter how good your test tool is, opting to purchase a more advanced tool that can keep you safer is always preferred. These advanced tools may be worth the investment than the old ones you have right now.

Electric Safety: Holding test tools with both hands

Actually, try not holding anything at all if it’s possible for you to do so. The goal of every operation is for you to limit your contact to any live wires or any tool that can bring you harm. So, if you must hold your tools when testing electricity, always do it with one hand. Doing so will lessen your exposure to harm if ever there are any unfavorable occurrences.

Nevertheless, the best option for you is to go hands-free (if the operation or the project itself allows it). You can try hanging your device somewhere while testing electricity. Some Fluke tools actually have this feature so that any worker can feel safer doing a ‘hands-free’ job.

Electric Safety: Replacing fuses with cheaper ones.

The fuses that you bought together with your digital multimeter are tested in regards to the CAT safety standards. Moreover, the one that is originally installed in your device can surely withstand any overload or faulty electric wiring. On the other hand, buying from another source might not level up to the original one. It’s always to be better off safe than sorry, so when replacing your digital multimeter’s fuses, buying from an original source is always the ideal choice.

Electric Safety: Don’t neglect your test leads.

One of the most important accessories you can have for your digital multimeters is your test leads. Remember, test leads don’t come in one form. There are a lot of other types that are better suited for the project you are working on. A word of advice, for further safety measures, try looking (or consider purchasing) test leads with finger guards, non-slip surfaces, shrouded input connectors, and those with double insulation.

Purchase from an authentic source!

Hey, you made it to the bottom! Are you currently looking for the best-performing test tools in the market to run daily maintenance checks on your machines? You’re in luck cause Presidium PH is an authorized distributor of Fluke test tools in the Philippines.

If you want to know more about Fluke tools and their functions, visit our website for more info! This is a one-stop-shop for the best test tools within Metro Manila.

Read more

Why is Calibration Important?

Often, we hear calibration mentioned when we search for Fluke tools online. But do we really know what it truly means? Calibration is one of the most important steps to knowing if your device is measuring up to its full potential, and that is why it is important. Given that there are different devices, calibration also comes in different forms relating to the tool that needs to be calibrated.

What is Calibration?

A value of a tool is everything. Calibration is the process of comparing a device under test of an unknown value. Only this time there will be a reference standard of a known value. With this process, a thorough reading can be done with the tool being used. By performing calibration to tools, errors can be determined, faults can be found, limitations can be evaluated, etc.

Take thermometers as an example. It is a given fact that thermometers measure temperatures, right? You can conduct a calibration test on thermometers by putting them in water with a boiling point of 212 degrees Fahrenheit. By doing so, you will be able to learn the errors that the thermometer holds. Remember, visual facts hold less than actual testing. And by placing calibrated reference thermometer under a series of tests, you will be able to find out its precise value. One of them is putting the device under test, which is the thermometer into the water, yes that is one way to do it.

But do not be mistaken, calibration is not an act of corrective adjustment. Corrective adjustment is completely different from calibration which also requires the use of different methods. Nevertheless, calibration is a process that leads you to the step of corrective adjustment only if it applies to the device.

Why is it important?

Calibration tools are relied upon by many professional engineers, technicians, metrologists, and more. This is because calibration can help them gain more confidence regarding the tool’s safety and reliability. It is not just tools that are calibrated but a lot of things such as flights, medications, nuclear facilities, computers, appliances, cell services, and many more. These industries also go through the process of calibration to not only ensure safety and reliability but also for quality and cost.

Calibration is a way to make sure that all tools are working in their optimum condition. Moreover, it is also a way to prevent failures when in use or while in production.

But that is not all, what makes this all the more impressive is its enablement to open doors to opportunities. Calibration takes steps (considering that it is continuously developing) to improve scientific discovery and industrial manufacturing.

The Chief Corporate Metrologist of Fluke Corporation

Jeff Musk actually has some very important insights regarding the importance of Fluke calibration. According to the chief, he said, “If you are performing measurement where the results will make a critical decision such as a safety test or if a manufactured product meets requirements, you must have your equipment calibrated so that the performance is known and fit for purpose. This is especially important if you want your results to correlate with others around the world.”

Another fact of why calibration is important is because all things wear down, especially with electronics. Overall, expect that your device will not look, feel, and perform as it once was when it was brand new. Expect that there will be lapses in time. But by doing the annual calibration, you will be able to make sure that it operates properly based on its product specifications.

Different kinds of calibration.

There are various kinds of Fluke tools in the market, each boasting special functions, and applications in different electrical or mechanical work. With this said, it is ideal to have not one but multiple calibration tools to make sure each device works properly and perfectly in different projects or operations. Fluke has six different calibration tools that you need to know about. Here are some of them…

  1. Electrical
  2. RF
  3. Temperature
  4. Humidity
  5. Pressure
  6. Flow

Calibrate through an authentic source!

Presidium PH is an authorized distributor of Fluke test tools in the Philippines. Rest assured that all tools have gone through proper tests to prevent faults from penetrating your projects that might cause bad downtimes by using the best test tools there are!

If you want to know more about Fluke tools and their functions, visit our website for more info! This is a one-stop shop for the best test tools within Metro Manila.

You could reach us at info@presidium.ph / calservices@presidium.ph for inquiries.

Read more

All You Need To Know About Non-Contact Voltage Testers

Being one of the sought-after tools in the market, Fluke’s non-contact devices take center stage. Fluke being able to create tools that can help workers take tests and measurements from a safe distance is one of its defining features. Expect that almost half of the test tools will have this winning function.

On the other hand, non-contact voltage testers don’t stray far from its family of digital multimeters. Only this time, they offer a more direct approach to detecting voltages. Not to mention, they are also very handy in terms of sizes. Here, we will be discussing all you need to know about them!

What is a Non-Contact Voltage Tester?

For staff in the electrical, industrial, and maintenance departments, this is a huge sigh of relief. Gone are the days of hesitant testing and risking people’s safety. To put it plainly, non-contact voltage testers are used to see if the voltage is present or not. Additionally, this tool can also detect mis wires of electrical outlets.

This portable tool is very well-liked for its simple and quick approach to see if the harmful voltage is taking place within your outlets or electrical panels. What is better? It does not entail a lot of buttons pushing or navigating, but it is mostly favored by maintenance people for its direct approach.

Choosing the right Non-Contact Voltage Tester for you.

There are diverse types of non-voltage testers. It’s best if you assess the operations, you usually do before purchasing a non-contact voltage tester to make the most out of it. Plus, keep value in mind when looking at non-contact voltage tester prices and remember that the best price does not necessarily equal the best value. With this said, take note of these Fluke non-contact voltage testers to determine the one for you.

Fluke 1AC II VoltAlert™ Non-Contact Voltage Detector

The Fluke 1AC II Volt Alert is perfect if you need a high-performing tool for general voltage detection. Uneasy leaving tools to shut down on its own? This non-voltage detector comes with an on/off switch of your convenience.

Here are more of its notable capabilities:

  • Voltage range: 90 V to 1000 V AC
  • Voltbeat™ technology and continuous self-test — so you always know it is working
  • Voltage indication: tip glows and beeper sounds (beeper can be disabled)
  • Safety: CAT IV 1000 V
  • On-off switch for maximum battery life

Fluke 2AC VoltAlert™ Non-Contact Voltage Detector

The Fluke 2AC Volt Alert is perfect for people who usually work in environments wherein sight indication is more preferred than sound. If you are a person who’s always on the go and needs a ready stead voltage detector, then the Fluke 2AC VoltAlert is the one for you. Although it still does feature audio beep voltage indicators, so technically speaking it’s just a tad bit more advanced than Fluke 1AC considering its extra features.

Here are more of its notable capabilities:

  • 90 V to 1000 V AC voltage range
  • Voltage indication: tip glows
  • Voltage indication: audio beeper for quiet environments
  • Safety: CAT IV 1000 V
  • Always on, using special low power circuitry to sustain battery life and ensure your 2AC is always ready
  • ‘Battery Check’ function ensures battery is in good condition

How do non-contact voltage testers work?

As we’ve mentioned, it is very simple and direct. Just touch the tip of your non-contact voltage tester to an electrical strip and wait for a beeping sound. Also, watch if the point turns either red or green. Red light indicates that high voltage is present while a green light tells that the wire does not harbor any dangerous voltages.

Here are things you should also remember when operating a non-contact voltage tester…

  • The tip glows red and a beeper sounds when voltage is detected
  • A loud, easy to hear beeper will sound and the tip will glow red when voltage is detected
  • Optionally, the beeper can be disabled for use in quiet environments
  • Continuous self-test so you always know it is working
  • When the tip blinks red you know it is working properly
  • Provides a continual visual indication that the 1AC II is on
  • 90 V to 1000 V AC or 200 V to 1000 V AC voltage detection range for wide application use.
  • Wide voltage detection range allows for use in a broad range of applications
  • Also available in a low voltage model from 20 V to 90 V AC for controls circuits

Can I get shocked while using a voltage tester?

We know, it is the complete irony for a device to be called “non-contact” and still require contact when being used. However, if your concern is getting shocked then let us put you at ease. Fluke specializes in making tools that prevent workers from getting hurt, and this does not leave out the Fluke voltage testers. 

Considering shocks, make sure that you are using and holding your voltage tester properly. Doing so will shield you from shocks. Only hold them on the insulated handle when you are undergoing an operation.

Okay, so we’ve touched up where to hold your voltage tester. Now, let us talk about watching where you are placing your other free hand. Make sure that it is not touching something that will expose you to live currents still (if ever the insulation fails).

Another word of advice, never undergo testing without wearing the proper personal protective equipment. Tools are just covering one part in protecting you from electrocution but having your PPE will provide you the complete safety and confidence you need when you’re working with these kinds of projects.

Some non-contact voltage testers can show a false positive or negative if…

Environmental factors can play a key role in getting accurate data from test tools. These are things that you need to consider, and from time to time, adjust to. Like all tools alike, the non-contact voltage tester is not different. At times, the device may show false positive or negative results. This is why it is especially important for you and your safety to take note of what is causing them for prevention purposes.

Reasons for false positive or negative:

  • The insulated test point touches grounded metal
  • The cable being evaluated is partially buried
  • The user is isolated from ground
  • The tester is used inside a metal enclosure
  • The cable is shielded
  • The battery is dead

The difference from other non-contact Fluke devices.

Fluke’s main priority is developing test tools that will keep workers and maintenance people safe in every operation. And to this day, they have kept their promise of providing workers the best test tools there are. This superbly handy non-contact voltage tester, however, differs from most since, well, it is smaller with more direct functions. No need to press a lot of buttons, no complicated navigation, and you will not even spend time reading the manual for this one. That is one of the winning factors of this test tool.

Purchase from an authentic source!

Hey, you made it to the bottom! Are you currently looking for the best-performing test tools in the market to run daily maintenance checks on your machines? You are in luck cause Presidium PH is an authorized distributor of Fluke test tools in the Philippines.

If you want to know more about Fluke tools and their functions, visit our website for more info! This is a one-stop shop for the best test tools within Metro Manila.

Fluke 1AC: https://presidium.ph/product/fluke-1ac-a1-ii-non-contact-voltage-tester/

Fluke 2AC: https://presidium.ph/product/fluke-2ac-non-contact-voltage-tester/

Read more

What is Nonstandard Fault Diagnosis and How Do We Deal With It?

What is it?

Wondering what a non-standard fault diagnosis is? If you are not a maintenance person, this may sound alien to you, but for maintenance people out there, it may be a piece of common knowledge. To give you a brief context, this kind of fault can easily be prevented by the thorough configuration and setup of your Fluke tool. Yes, that’s right, nonstandard fault diagnosis can stem from the assembly of your Fluke tool itself.

So before you go blaming the machine, see if you’ve got everything inputted in your Fluke device. Then again, aside from the setup itself, there are also some other underlying issues on why your Fluke tool is tagging it as a nonstandard fault diagnosis.

The three main causes of nonstandard fault diagnosis

With the use of Fluke tools, no doubt you can spot issues within your machines in a jiffy! For this one, we strongly recommend the use of the Fluke 810. Vibration Testers are one of the most recommended tools to spot machine faults. Not only is it highly effective in the field, but it can give you accurate diagnoses and solutions.

One of the most wonderful functions of this Fluke tool is its ability to detect, locate, and assess the severity of issues within equipment and rotating parts. May it be bearing condition, misalignment, imbalance, or looseness, one thing is for sure, it can be seen and resolved with the use of the Fluke 810 Vibration tester. In line with this, it can also tell nonstandard faults. Here are the three main causes…

1. Incorrect or incomplete setup. For this to work, you need to accurately input all the data of your machine while setting up the Fluke 810 Vibration Tester. One of the common faults of why you’re getting a nonstandard fault diagnosis is you’ve not put all the information of the machine you’re testing. So take note, it’s important for you to process everything while setting up your vibration tester.

2. Incorrect or insufficient data collection. Again, incorrect inputting of data plays a big hand in this. Technically, this happens when the minimum data collection requirements were not met. Moreover, the running speed of the machine (which was not accurately entered) can also be the cause of this.

3. Vibration condition other than one of the four standard faults. Yes, you can still have a nonstandard fault diagnosis other than detecting the four standard faults. Ideally, The Fluke 810 recognizes these readings. However, we will get to that in a little bit.

How to deal with nonstandard fault diagnosis

If you find yourself having a nonstandard fault diagnosis whilst doing a normal testing procedure, the next thing you should do is to have another test. See if the result stays the same or if it changed. If the results change, then it might just be the effects of having data collection errors or vibration events. However, if you do get another nonstandard fault diagnosis, then it might be high time to undergo another process. Here is how you will do it…

  • You might have to tinker with your Fluke tool. Specifically check if information about the driver, transmission, and driven component has been entered (or other relevant data). In addition, also take note of the component types. Was the AC motor accurately described like the DC? How about the screw compressor? It might have been entered as a piston compressor.

Technically, these are the things you have to double-check once you have a second reading of a nonstandard fault diagnosis.

  • Data quality and quantity are enough to achieve an accurate diagnosis. Again, complete information is necessary when you’re working with the Fluke 810 Vibration Tester. A good practice (or something to keep in mind) is never to set up or test partial drivetrains.
  • Double-check if the vibration data was collected. See if the location and orientation of the components are the same as the ones on the setup diagram in the Fluke 810.

Consider these other fault conditions…

In such a time that you’ve inputted all information but are still getting the same nonstandard fault diagnosis result, then you might consider these other faults that are not brought up by your Fluke 810 device setup. According to an official Fluke source, these are the probable causes…

Electrical

Electrical switching fault in a variable frequency drive

Problems with Motor components (stator, winding, commutator, brush)

Motor lamination looseness

Motor air gap problem

Line phase voltage imbalance

Non-bearing mechanical element wear or defect

Pump component (vane, timing gear, impeller, piston, idler shaft, rotor) wear or clearance problemsMotor cooling fan blade damage

Gearbox input shaft pinion problem

First gear mesh problem or wear

Fan wheel wobble

Fan dirt buildup or blade clearance problem

Sheave problems

Drive belt irregularity

Coupling wear

Compressor components (rotor thread, piston/valve, impeller, lobe) wear

Flow related

Pump cavitation or air ingestion

Fan airflow disturbance

Compressor gas pulsation Structural

Structural vibration or resonance

Motor or pump mounting flexibility

Motor foundation flexibility or resonance

Foundation weakness or resonance

Foundation vibration

Fan mounting transverse flexibility

Other

Overloaded accelerometer

Oil whirl

Oil whip 

Resolve these failures using Fluke Tools!

Hey, you made it to the bottom! Are you currently looking for the best-performing test tools in the market to run daily maintenance checks on your rotating machines? You’re in luck cause Presidium PH is an authorized distributor of Fluke test tools in the Philippines. Prevent these faults from penetrating your rotating machine by using the best test tools there are!

If you want to know more about Fluke tools and their functions, visit our website for more info! This is a one-stop shop for the best test tools within Metro Manila.

Read more